
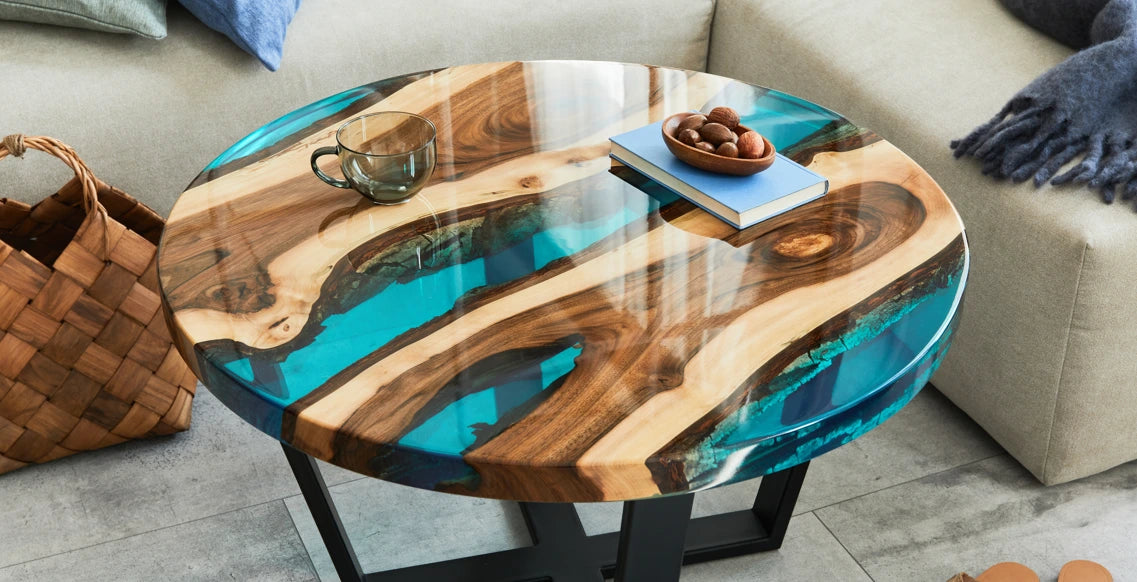
In the captivating world of interior design, making an epoxy table is a remarkable fusion of nature and innovation. This artistic process does not simply transform a space; it invites you on an adventure where traditional craftsmanship meets modernity. In this article, we will reveal the secrets of creating an epoxy table, a piece that is sure to become the focal point of any room, whether it is intended for indoor or outdoor use.
Epoxy, with its clear gloss and its sturdiness, offers an exceptional playground for makers and DIYers. By encapsulating the natural beauty of wood, this resin creates a stunning visual effect that shows off the patterns and nuances of the wood. But before diving into this world of creation, it is essential to understand the basics and the techniques that will guarantee a result that lives up to your expectations.
Our aim in this article is not only to guide you through the steps of making one, but also to stimulate your creativity and give you the tools to personalise your epoxy table to your taste. Whether you are a DIY enthusiast looking for a new project or an interior decoration lover wanting to add a unique touch to your space, follow us on this creative journey to discover how to bring your own epoxy table to life.
Which wood should you use for an epoxy table?
The first step in making an epoxy table is choosing the wood. This choice should not be taken lightly, as it is the canvas on which you will paint with your resin. The options are vast, but some types of wood lend themselves to this process better than others.
Selecting the wood
The choice of wood needs to be thought through. Hardwoods such as walnut, oak or ash are often preferred for their aesthetic qualities and durability. Their distinctive grain and sturdiness make them ideal candidates to bear the weight and density of epoxy. In addition, these species resist warping and cracking well, ensuring the longevity of your table.

Important characteristics
Well-dried wood is essential. Residual moisture in the wood can cause problems when applying the epoxy, leading to cracks or bubbles. It is also important to choose boards without cracks or major warping. The natural beauty of the wood plays a crucial role in the final look of the table. Wood with an interesting grain, knots or other unique features can add an extra dimension to your finished piece.
Preparing the wood
Before applying the epoxy, the wood must be carefully prepared. This involves sanding the wood to obtain a smooth surface, free of any irregularities. This step is crucial to ensure that the epoxy adheres properly and to reveal the natural beauty of the wood. After sanding, the wood must be cleaned to remove any dust or residue. Some craftspeople choose to apply a primer or sealer to the wood before pouring the epoxy, but this depends on the desired effect and the type of wood used.
Aesthetic considerations
The choice of wood determines not only the strength of your table, but also its look. Each species of wood has its own palette of colours and grain patterns, offering a multitude of options to suit your personal style. For example, walnut, with its rich, dark tones, creates an elegant and sophisticated mood. Oak, with its distinctive grain patterns and lighter shade, brings a touch of warmth and naturalness. By considering the contrast or complementarity between the colour and pattern of the wood and the clarity of the epoxy, you can create a work of art that fits perfectly into your space.
Suiting the space and the use
When choosing your wood, also think about where the table will be placed and how you will use it. A harder, denser wood, such as beech or oak, will be more resistant to scratches and knocks, making it ideal for dining tables or desks. For a side table or a decorative piece, you can opt for lighter woods or ones with more pronounced features, such as growth rings or knots.
Durability and upkeep
Finally, consider the durability and upkeep of the wood you choose. Although epoxy protects and seals the wood, some woods need more regular care to keep their shine. Harder woods with natural finishes are generally easier to maintain and stand up better to the passing of time.
What epoxy thickness should you use for a table?
The thickness of the epoxy resin is an essential element that influences not only the look of your table, but also its function and durability. A well-chosen thickness guarantees a smooth, professional finish, while ensuring the strength needed for everyday use. The question of the perfect epoxy thickness is not simply a measurement to be respected; it is a decision that shapes the character of your table.

In general, an epoxy thickness of about 1 to 2 inches is recommended for most tables. This thickness offers an ideal balance between aesthetics and function. It allows enough depth to show off the richness and complexity of the wood beneath, while providing a sturdy, durable surface for everyday use. A layer that is too thin might not offer the protection and stability needed, while a layer that is too thick could upset the visual balance of the table and make the pouring process more complex.
However, the final decision depends on several factors, including the size and design of the table, as well as personal preferences. For small tables or those with fine details, a thinner layer may be more appropriate. For large tables or those intended to be centrepieces, a thicker layer may be more impressive and offer greater strength.
It is also important to consider the epoxy pouring process. A greater thickness calls for a more precise pouring technique to avoid air bubbles and ensure an even cure. It may be necessary to pour the epoxy in several layers, leaving each layer to partially harden before applying the next. This method not only controls the thickness, but also gives a more uniform finish without flaws.
In short, choosing the right epoxy thickness for your table is a critical step that calls for careful consideration. Take into account the size of your table, the type of wood used, and your aesthetic goals. A good epoxy thickness ensures that your table will be not only beautiful, but also functional and durable.
How do you apply epoxy resin to wood?
Applying epoxy resin to wood is a key step in making your table. It is a process that requires precision, patience and attention to detail. A successful application turns a simple piece of wood into a glossy, durable work of art, while an imprecise one can compromise the quality and look of your project.
The first step is preparing the wood surface. Careful sanding is essential to ensure a smooth, clean surface, ready to receive the resin. All impurities, dust and residue must be removed. This step is crucial because it directly affects how well the epoxy adheres and the final look of the table. Well-prepared wood lets the resin spread evenly, creating a flawless surface.
Next comes mixing the epoxy resin. Follow the manufacturer's instructions scrupulously for the mixing ratio of resin to hardener. An incorrect mix can lead to curing problems, affecting the strength and clarity of the epoxy. Mix carefully to ensure a uniform consistency, avoiding introducing air bubbles into the mixture.
One of the keys to a successful application is to avoid air bubbles, which can form when mixing or pouring the resin. Air bubbles not only spoil the look of the table, but can also compromise the structure of the resin once cured. Use a blowtorch or a heat gun to pass gently over the surface of the epoxy, which will help bring the air bubbles to the surface and burst them.
After application, the epoxy resin must cure. This process can take several hours, even several days, depending on the thickness of the resin and the ambient conditions. During this time, it is essential to keep the table in a dust-free environment, to prevent particles from settling on the sticky surface. Once cured, the resin reveals a glossy, transparent finish, showing off the natural beauty of the wood beneath.

In conclusion, applying epoxy resin to wood is a process that combines technique and art. Every step, from preparing the wood to mixing the resin, from applying it to letting it cure, plays a crucial role in making a quality epoxy table. With practice and attention to detail, you can turn a simple piece of wood into a durable, elegant work of art, a reflection of your creativity and your skill.
Which resin should you use to make a table?
The choice of resin is just as crucial as the choice of wood in designing an epoxy table. The resin is the transparent heart that binds and shows off the chosen wood, so selecting the right one is essential to guarantee the longevity and look of your table. Epoxy resin is not just a component; it is the medium that turns your creation into a work of art.
There are a multitude of epoxy resins on the market, each with its own characteristics and advantages. For tables, we recommend using a casting-type epoxy resin, designed specifically for deep-pour applications. These resins are formulated to be poured in thick layers, minimising the risk of cracking and warping as they cure.
An important aspect to consider is the clarity of the resin. A transparent, high-quality resin shows off the natural beauty of the wood beneath. Look for UV-resistant epoxy resins to avoid yellowing over time, a common problem with lower-quality epoxies. This feature is particularly important for tables exposed to natural light.
Scratch resistance and ease of maintenance are other factors to take into account. Some epoxy resins are formulated with advanced hardening agents to offer a harder surface that is more resistant to scratches, which is ideal for tables that will be used frequently.
Finally, consider the working time and curing time of the resin. Some formulas offer a longer working time, which can be useful for complex applications or for beginners. Curing time can vary depending on the formula, the thickness of the layer and the ambient conditions, so choose a resin that matches your needs and your schedule.
How much epoxy resin do you need for a table?
Calculating the quantity of epoxy resin needed for a table is an essential step that requires precision and planning. A correct estimate will help you avoid wasting material and make sure you have enough resin to cover the whole surface of the table evenly.
The quantity of resin needed depends on several factors, including the dimensions of the table, the desired thickness of the epoxy layer and the density of the resin. A simple way to estimate the quantity of resin is to use the volume formula: Length x Width x Height (or thickness). Make sure you measure in inches or centimetres and convert the dimensions to cubic feet or litres to match the resin's units of measurement.
It is also important to allow for potential losses through overflow or absorption by the wood. More porous woods can absorb a significant amount of resin, so extra is needed to reach the desired thickness. It is always advisable to allow a little more resin than the
calculation suggests, to make up for these losses and ensure complete, even coverage.
Another thing to consider is the inclusion of objects or decorations in the resin, such as stones, shells or metal inlays. These inclusions can reduce the amount of resin needed, as they take up space. Nevertheless, it is prudent to calculate the quantity of resin assuming full coverage, then adjust for the planned inclusions.
It is also wise to prepare a little more resin than necessary to cover any eventuality, such as last-minute repairs or touch-ups. Having a small amount of extra resin mixed and ready to use can be very helpful if you discover imperfections or air bubbles during the curing process.
In short, calculating the quantity of epoxy resin for your table is an exercise in balancing mathematical precision with practical variables. An accurate estimate will help you guarantee a smooth, even finish while avoiding waste of a valuable material. With careful planning and a little foresight, you can make sure you have the perfect amount of resin to turn your piece of wood into a magnificent epoxy table.
How does epoxy age?
The durability of epoxy resin is a crucial factor to consider, especially when making a table that will be not only a design feature but also a piece for everyday use. Understanding how epoxy ages will help you keep your table in perfect condition for years.
Epoxy, known for its sturdiness and resistance, is a popular choice for tables because of its ability to withstand scratches, knocks and everyday wear. However, like all materials, epoxy can change over time. One important aspect to consider is how epoxy reacts to UV exposure. Although most epoxy resins are treated to be UV-resistant, prolonged exposure to the sun can cause slight yellowing or discolouration of the surface. For tables placed in sunny areas, it is advisable to choose an epoxy resin specifically formulated for high UV resistance.
Another aspect of epoxy ageing is its reaction to temperature variations. Although generally resistant to normal temperatures, epoxy can expand or contract slightly with extreme changes in temperature. This is particularly relevant for tables used outdoors. Good practice is to keep the table in an environment where the temperature is relatively stable.
Maintenance plays a crucial role in the longevity of your epoxy table. Regular cleaning with non-abrasive products will help maintain the clarity and gloss of the resin. Avoid harsh chemical cleaners or scouring pads, which can scratch or dull the epoxy surface.
As for scratches and wear, although epoxy is resistant, it is not completely damage-proof. Small scratches can often be repaired with light sanding followed by a new coat of resin. For more serious damage, it may be necessary to sand the whole surface and apply a fresh coat of epoxy, a task that can be undertaken by a professional or an experienced DIYer.
In conclusion, although epoxy is a durable, resistant material, it needs proper maintenance and attention to exposure conditions to keep its beauty and function over time. With the right care and precautions, your epoxy table will remain an elegant, practical design feature for many years.






